If you want to add a rustic touch to your home, learn how to install shiplap. This easy DIY project can help add a farmhouse look to any room in your home.

Shiplap is a great option for those wanting to give any space a rustic look. It is durable, and the installation process is a better option than drywall – it is faster and easier.
While we are doing this process in our doublewide manufactured home, the process is the same for any home.
This tutorial on how to install shiplap will guide you through installing shiplap on walls in your home.
How to Install Shiplap on Wall
I wanted more than drywall’s plain, unappealing look in our home. I also wanted an easier solution than attempting to hang drywall due to the frustration of working with it.
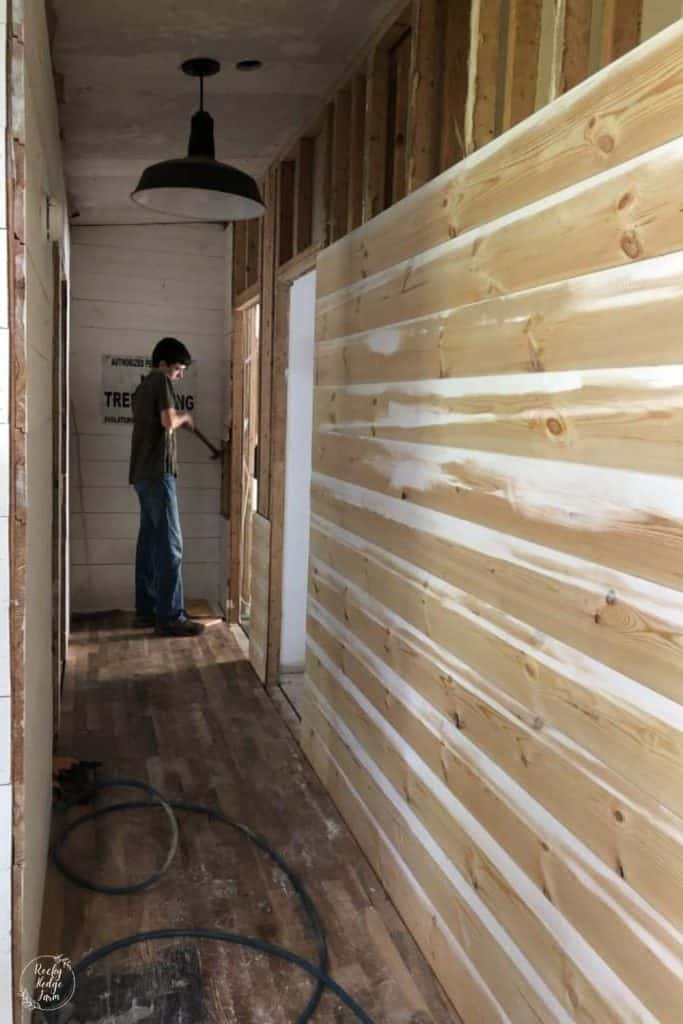
I started installing shiplap on the hallway walls about a year and a half ago. I got halfway finished when we started the process of moving our home.

What Is A Shiplap Wall
Shiplap planks are wooden boards, usually pine, mostly used for constructing rustic buildings. Traditional shiplap has a special groove cut into the board’s top and bottom edges, allowing the pieces to fit together snugly, forming a tight seal.
In recent years, it has become increasingly popular to use shiplap on the interior design of homes to create planked wood walls.
Installing horizontal shiplap boards inside the home can help carry the eye around the room, making it feel larger. When installed vertically, it can help make a room feel larger by emphasizing the height of a wall.


What Is The Difference Between Shiplap And Tongue And Groove
The difference between shiplap and tongue and groove boards is how the grooves are cut on the top and bottom edges of the boards.
In general, shiplap boards have a groove cut where the boards rest on each other and overlap. Tongue and groove boards join together and interlock.
Remodeling Walls With Shiplap Planks
There are various ways to hang shiplap planks on walls to get that shiplap look. Choices range from actual shiplap boards, tongue and groove boards, faux shiplap using plywood, and even shiplap peel and stick wallpaper.
For our home, our personal preference is to use actual pine shiplap boards.

Supplies Needed To Hang Shiplap On Mobile Home Walls
First, for this tutorial, we are using tongue and groove boards. I ordered shiplap boards but got tongue and groove. I know the company would have gladly exchanged them, but we did not notice until we got home.
Here are the supplies we used to install shiplap on our mobile home walls.
- 16-foot pine tongue and groove boards
- Nail Gun
- Air Compressor
- Air Hose
- Hammer
- 2″ Galvanized Finish Nails
How To Install Shiplap On Walls
Once we began installing shiplap into our home, I was instantly in love with the warmth and coziness it created. I have used it in almost every room, and I love the convenience of never having to search for a stud when I need to hang something on the wall.
With the right tools, installing a shiplap wall is a simple task, even for those with limited woodworking knowledge. All that is needed are some basic tools to get the job done.
Installing Shiplap Directly to Studs
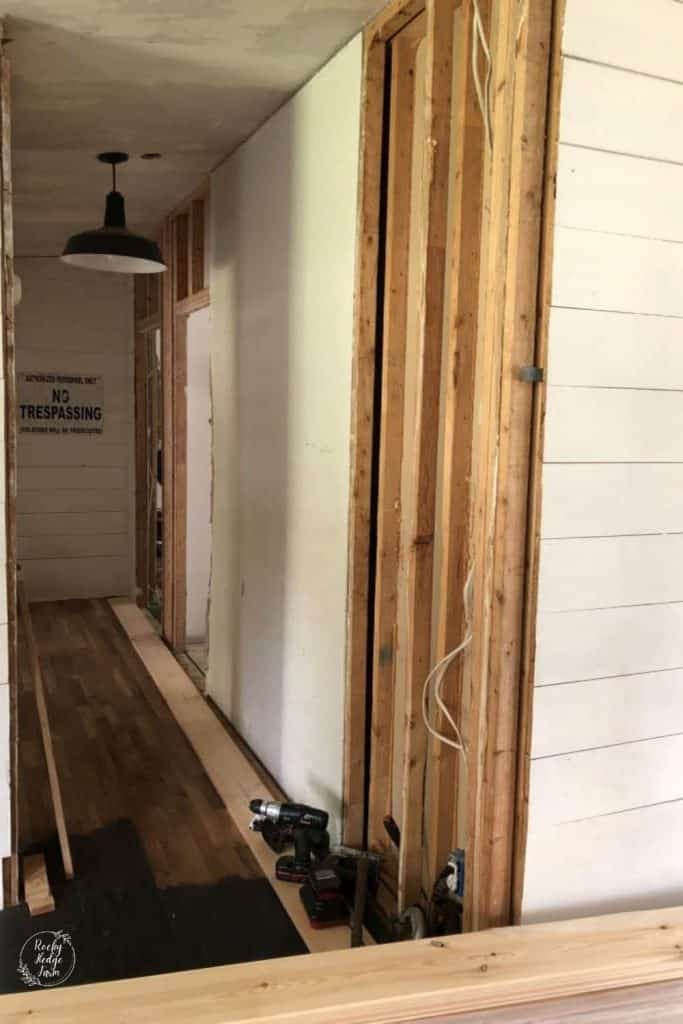
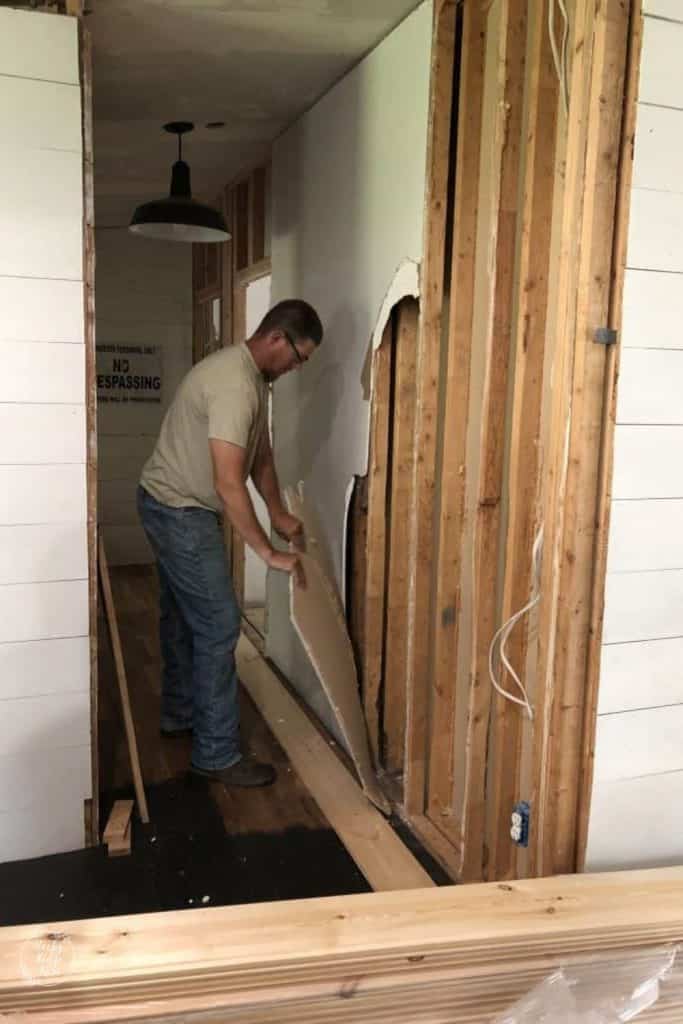
Remove Sheetrock
We removed all the sheetrock from the walls in our home before putting up the shiplap. This is an optional step as this may not need to be done in your home.
Depending on how the sheetrock is attached to the studs, it could be hard to remove and may come off in small pieces. In many places within our home, the sheetrock appeared glued to the walls and stapled.
After removing the sheetrock from the walls, either hammer the nails/staples into the studs or completely removed them. The goal is to get a flat area for the board to attach.

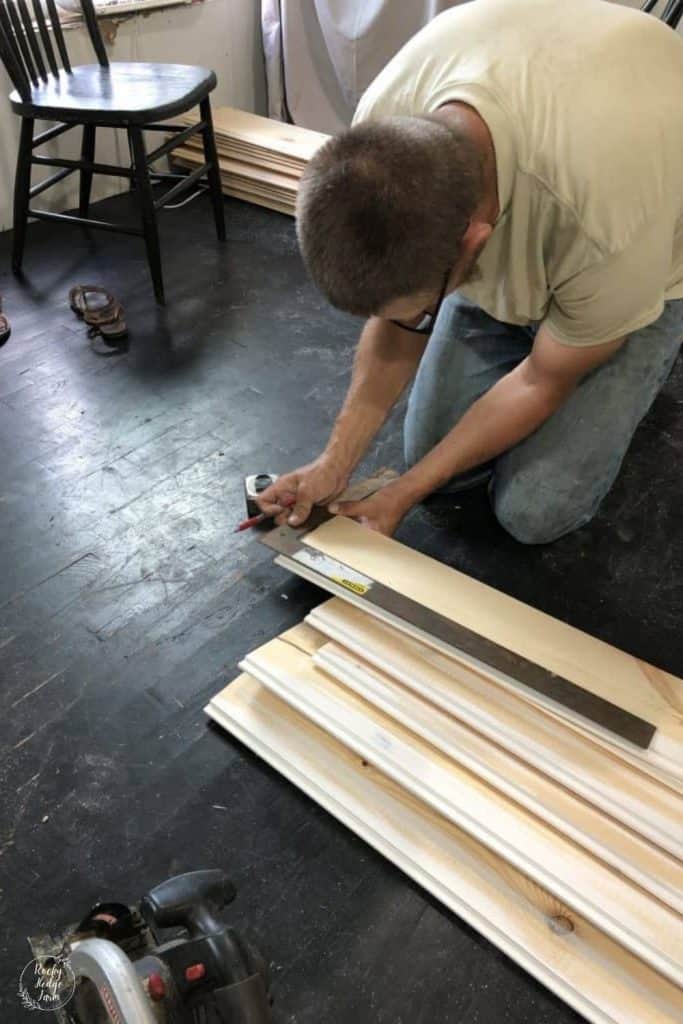
Step 2: Measure the Wall and Cut Boards
The next step is to measure the wall where we would install the shiplap. Start at the bottom and work to the top of the wall.
For this wall, we measured and knew we would need eleven boards cut the same size. This would cover the largest area from the floor to the top of the door frame of the first bedroom.
My husband cut all eleven boards simultaneously, so he did not have to continually stop, cut a board, nail a board, and then measure and do it all over again.
It was easiest to cut them all at once, then work on installing the boards.

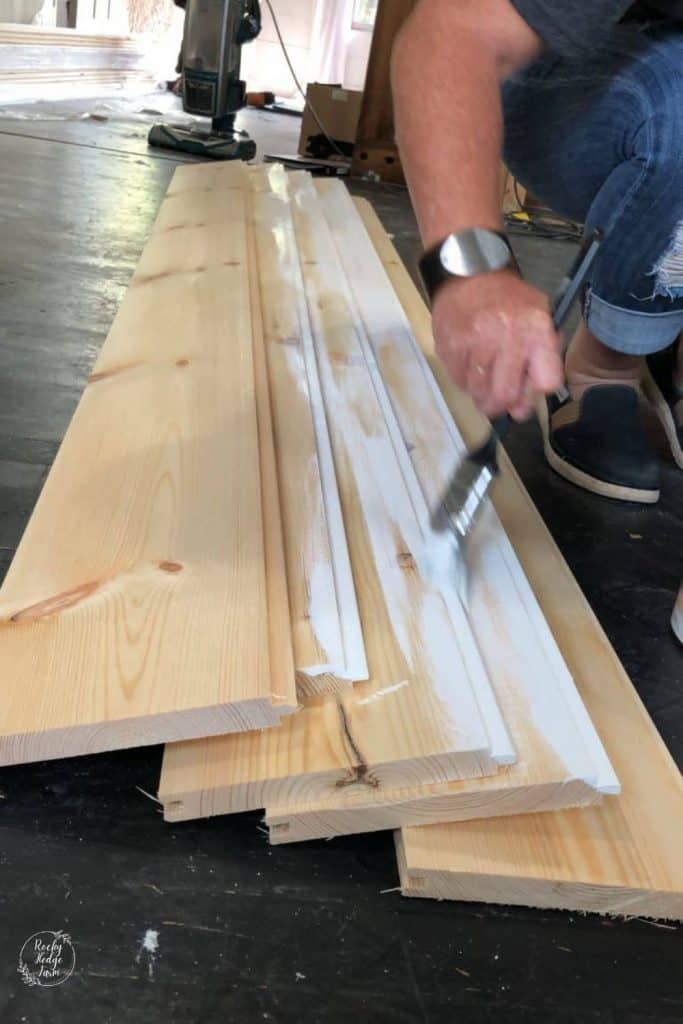
Step 3: Paint the Boards
When my husband started cutting the boards, I started applying a thin coat of my favorite paint color, Snowbound by Sherwin Williams, to the grooves of the boards.
I do this because it is nearly impossible to paint in the groove after the boards are all attached to the wall.
It is easiest to paint the shiplap boards before attaching them to the wall. By the time Timothy has finished cutting the boards, the first shiplap board I painted is dry and ready to hang.
There is also the possibility of painting the boards the day before.
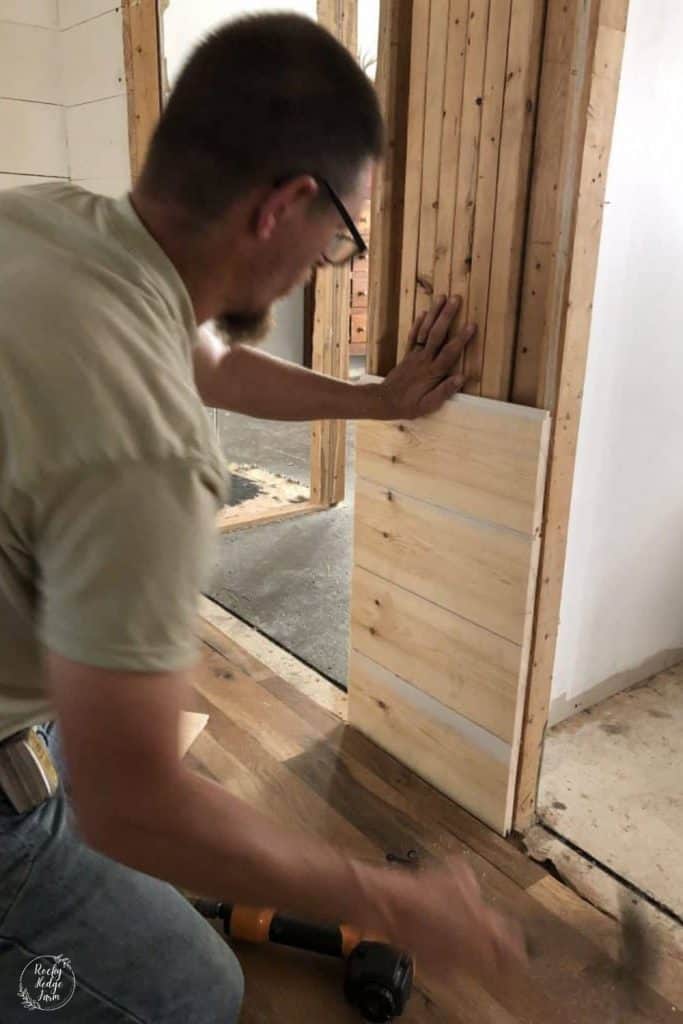
Step 4: Attaching Shiplap To The Mobile Home Walls
Timothy laid the first board on the floor to attach the shiplap to the walls. He then used a nail gun to attach the shiplap to the wall using 2″ galvanized finishing nails.
He nailed through the top of the tongue and groove board directly into each one of the studs.
You must interlock them securely without hammering on the actual tongue and groove part itself when using tongue and groove boards.
Hammering on the tongue and groove edge can break or damage it, causing the next board not to interlock correctly.
Timothy used an old tongue and groove flooring to ensure the boards were securely interlocked into the grooves. You can also watch the video to see how he does this.
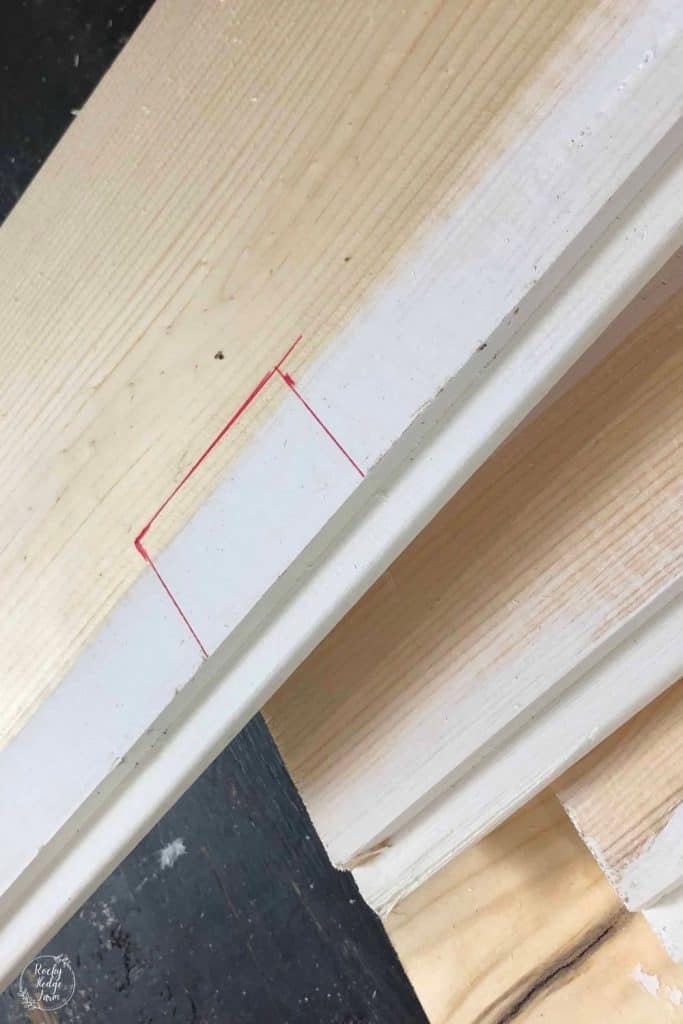
Once we got to where a shiplap board needed to be cut for an outlet, Timothy took measurements and followed the below step.


Step 5: Measure Around Outlets, Windows, and Door Frames
The hardest part of installing shiplap on walls is cutting around the outlets, windows, and door frames. Of course, the measurements will be different for each home, and it will be a matter of measuring what needs to be cut out on the board.
For the hallway, Timothy cut a board to fit around the bottom of the outlet and the top of the outlet. As we have been installing shiplap on our mobile home walls, Timothy has replaced the outlets and securely attached them to the studs.
To cut the hole that needs to fit around the outlet, Timothy used a tape measure to take the measurements, a square to ensure the lines were straight, and a jigsaw to cut the hole out.

Step 6: Measure for Other Areas
There was another smaller wall area in between the bedrooms that we had to measure before cutting and attaching the boards to the wall. Timothy measured the area, cut all the boards, and then attached them to the wall using the nail gun.
At the very end of the hallway, on a small area of the wall, we already had shiplap boards, However, we did decide to remove them and use the tongue and groove boards, so the entire wall was the same kind of boards.
Once Timothy attached all the boards to the top of the door frames, he had our son, Josiah, start helping hold the boards.
One of the reasons I love to use 16′ boards is, so I do not have a staggered look on the walls in our home. However, the hallway is just over 16′ so at the very end of the hallway, we have an area where two boards are butted up against each other to span the space. It will not be very noticeable with such a small space and at the very end of the hallway.
Once we got to the very top of the wall, the width was not big enough to fit the entire width of a shiplap board. So, Timothy measured and cut a board in half long ways to fit the final board in.
Step 7: Finish Painting the Installed Shiplap Boards
After attaching all the shiplap boards to the wall, the final step is to paint them before attaching any trim.
Installing shiplap is an easy project that can make any home’s walls, including mobile home walls, have that rustic farmhouse charm that so many love.
I hope that this tutorial on how to hang shiplap on mobile home walls shows how easily it can be within a few short hours.

DIY Video Tutorial | How To Hang Shiplap On Mobile Home Walls
Please talk to a licensed contractor before altering the electrical wiring in your home. Clayton Homes sponsor this video.
Originally posted on October 18, 2019, updated on January 9, 2023
Looks great! And Timothy makes it look easy ?♀️
It is pretty easy once you get the hang of it.
I’m not exactly sure what tongue and groove is obviously boards.But is it cheaper than the stuff they promote as “shiplap” because that’s expensive. Its Why we haven’t done it. You get a tiny little Box for anywhere from $30 to $60 or more. So is tongue in groove flooring what is it? What was your aource for purchasing. Thanks
We bought ours from a local lumber yard. You can use tongue and groove flooring as well. We purchase 16 ft boards in actual shiplap except this time it ended up being tongue and groove. Its much cheaper to get it this way from a lumber yard or local sawmill.
I can’t wait to see how you finish off your hallway! I’m curious how you plan to finish the corner there in the foreground of the photo. I also live in a mobile home, and am currently ripping out 20+ year old carpet. So gross!! But in the end it will be awesome! I love the look of your rustic painted/sanded hardwood floors! But don’t have the patience to do that to my own floors hahaha! We’re planning on tiling the floors with the wood-look ceramic tiles. Easier with kids, animals and rough country living (aka dirt roads and driveways!) I love what you’re doing! Can’t wait to read your next post! You inspire me!!
Thank you! We haven’t finished off the ends since we had a beam installed last week. We can now work on getting that done and I will update once we do.
Did you finish the ends? I’d love to see the finale’ with the beams on the end.
Looks nice! I think you were lucky to have sheetrock walls. Most mobile homes do not. Most have some sort of paneling with thin strips between them down the middle of the walls. Wich most of us mobile home owners don’t like. They can be painted but do not look as nice as a sheetrock wall. It was a great post with lots of details but I don’t feel it was pertained to mobile home owners.
My Sheetrock walls still had the thin strips on them. I removed all of those before doing shiplap. I call it Sheetrock but it’s about half the thickness of regular shiplap
I am so glad I found your blog. I have almost the same foot print as your house. This is a project we will be working on the next year. Thank you for sharing. P. S. Now maybe I can convince my husband to remove our corner fireplace for a wood stove.
Do you have to remove the Sheetrock? Did you ever finish the ends of the hallway? Would love to see if so! It’s beautiful.
you wouldn’t have to remove the sheetrock, and we haven’t finished the ends. Trim will be the last thing we do since we have to finish the ceilings and the beam that we put up between the living room and kitchen area.
is this real sheetrock or the paneling that comes with a 1994 mfg home? I am NOT a fan of original paneling… what can be done with it? can you add another panel over this?
We had very thin sheetrock pieces that had strips over them. I would assume you could put shiplap over the panels as long as it is nailed into the studs.
Thanks for sharing all of this. I always get a little nervous with my measuring skills which always makes me a bit wary of trying something like this because I’m sure I’m going to mess up and cover an outlet on accident haha But I do look forward to trying this in my mobile home. As soon as it’s done we are going to refinish the wood floors and try to rent it out as soon as possible.