How to Make Crispy Hash Browns From Frozen In a Skillet
Prepare for the best way to make crispy, golden brown hash browns in your cast iron skillet! This quick and simple recipe uses frozen shredded hash browns, making it the easiest way to enjoy delicious hash browns for breakfast, brunch, or as a perfect side dish.

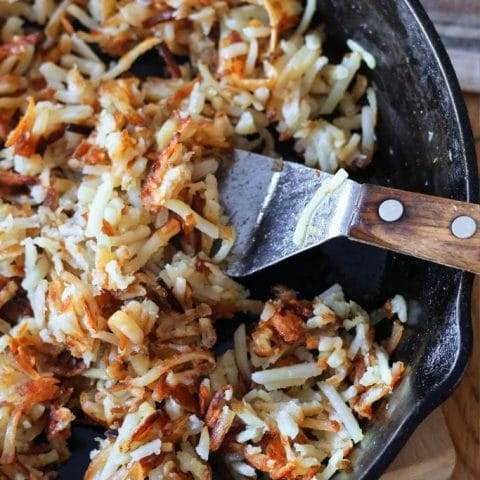
Cast Iron Skillet Hash Browns
This recipe is all about simplicity! It uses frozen shredded hash browns when you want a delicious, crispy hash brown fix without the extra effort of peeling and shredding potatoes yourself.
While there’s always something special about cooking from scratch, there’s nothing wrong with choosing convenience when you crave a hearty breakfast in a hurry. Try my Sausage Hashbrown Breakfast Casserole for a perfect way to use those golden hash browns.
Pre-shredded potatoes in your cast iron skillet will still yield those perfect, golden hash browns!

Ingredients Needed to Make Skillet Hash Browns
- 1 BAG OF FROZEN SHREDDED POTATOES
- FAT: Using bacon grease from cooked bacon adds flavor to hash browns and creates a non-stick coating. You can choose cooking oil as well, but avoid using olive oil.
- BUTTER: Butter adds a layer of rich flavor to the potatoes and helps them achieve a perfectly browned and crispy texture.
- SALT AND PEPPER: To taste, for basic seasoning.
Kitchen Essentials You May Need: XL No 12. cast iron skillet and spatula


How to Make Crispy Hash Browns From Frozen
Grab your cast iron skillet next time you’re craving crispy hash browns – it’s time for golden-brown perfection! Here’s an easy recipe with simple steps:
- HEAT THE SKILLET: Place a large skillet on the stove over medium heat. Add two tablespoons of your fat (bacon grease or cooking oil) to the hot pan along with two tablespoons of butter.
- ADD THE FROZEN SHREDDED POTATOES: Once the skillet is hot, carefully add the frozen hash browns in an even layer across the bottom of the pan. Do not overcrowd the pan, as this can prevent them from crisping correctly. Cook them in batches if necessary.
- COOK UNDISTURBED: Let the hash browns cook undisturbed for 4-5 minutes. This allows the bottom to become crispy and golden brown.
- FLIP: Using a spatula, flip the hash browns over to the other side.
- COOK UNTIL CRISPY: Cook for another 4-5 minutes or until the other side is crispy and golden brown. Adjust the cooking time depending on your desired level of crispiness.
- SEASON: Season with salt and black pepper to taste during the last minute of cooking for additional flavor.
- SERVE: When the hash browns are cooked to your desired crispness, transfer them to a plate lined with a paper towel to absorb any excess grease. Then, serve them hot, and enjoy!

Recipe Tips for the Crispiest Hash Browns
- Don’t overcrowd the pan: This is the golden rule for crispy hash browns! Spread the frozen shreds in a single layer to allow even browning and prevent steaming. Cook in batches if needed.
- Heat it up: A hot pan is crucial for achieving crispy perfection. Aim for medium-high heat (around 350°F) before adding the hash browns.
- Let them sizzle: Resist the urge to stir or flip too frequently. Allow the hash browns to cook undisturbed for 4-5 minutes to develop a golden brown crust on the bottom.
- Spice it up! While salt and pepper are classics, explore different seasonings like garlic powder, onion powder, paprika, cayenne pepper, or even your favorite herbs for a burst of flavor.
Storing Leftover Hash Browns
Don’t worry; you don’t have to eat all your delicious hash browns at once! Here’s how to store leftovers for future enjoyment:
- Let them cool: Allow the hash browns to cool completely before storing.
- Choose your container: Opt for an airtight container, such as a resealable plastic container or a glass container with a lid.
- Refrigerate: Place the container of leftover hash browns in the refrigerator. They will stay fresh for up to 3 days.
- Reheating: When you’re ready to enjoy your leftovers, you can reheat them in a skillet over medium heat with a bit of butter, in the oven at 375°F (190°C) for 8-10 minutes, or even in the microwave for a quick option (be aware, microwaving can make soggy hash browns)

What to Serve With Hash Browns
Hash browns are a great side dish for a quick breakfast. Try serving them with:


Making hash browns at home is incredibly easy. These crispy golden brown beauties are a delicious treat any time of day. How do you like to eat your hash browns? Share in the comments below!
How to Make Crispy Hash Browns From Frozen
Prepare for the best way to make crispy, golden brown hash browns in your cast iron skillet! This quick and simple recipe uses frozen shredded hash browns, making it the easiest way to enjoy delicious hash browns for breakfast, brunch, or as a perfect side dish.
Ingredients
- 1 bag of frozen shredded potatoes (26 ounces)
- 2 tablespoons bacon grease
- 2 tablespoons butter
- salt, to taste
- black pepper, to taste
Instructions
- HEAT THE SKILLET: Place a large skillet on the stove over medium heat. Add two tablespoons of your fat (bacon grease or cooking oil) to the hot pan along with two tablespoons of butter.
- ADD THE FROZEN SHREDDED POTATOES: Once the skillet is hot, carefully add the frozen hash browns in an even layer across the bottom of the pan. Do not overcrowd the pan, as this can prevent them from crisping correctly. Cook them in batches if necessary.
- COOK UNDISTURBED: Let the hash browns cook undisturbed for 4-5 minutes. This allows the bottom to become crispy and golden brown.
- FLIP: Using a spatula, flip the hash browns over to the other side.
- COOK UNTIL CRISPY: Cook for another 4-5 minutes or until the other side is crispy and golden brown. Adjust the cooking time depending on your desired level of crispiness.
- SEASON: Season with salt and black pepper to taste during the last minute of cooking for additional flavor.
- SERVE: When the hash browns are cooked to your desired crispness, transfer them to a plate lined with a paper towel to absorb any excess grease. Then, serve them hot, and enjoy!

About Sarah
Wife. Mother. From-Scratch Cook. Homemaker.
I’m Sarah, the creator of Rocky Hedge Farm, where I share my love for simple living, homemade meals, and creating a cozy home. As a wife and mother, I’m passionate about slowing down, cooking from scratch, and finding joy in the everyday moments of life. From DIY projects and family-friendly recipes, I hope to inspire others to embrace a life rooted in simplicity and warmth.


